How to use#
Python interface#
To use Mosayc, you need to:
Import the
Mosaycclass;Instantiate it with the desired parameters;
Call the
computemethod;You will get a Pillow image that you can use as you want, e.g. display or save.
Parameters#
input, default tomain.jpeg: the location of the main image that you want to turn into a mosaic. A good candidate should still be understandable when heavily blurred, otherwise the mosaic will not mean anything.tiles_dir, default totiles: the location of the directory that contains the tiles images you want to use. All images from that directory will be used.scale, default to 3: the scaling factor vetween input resolution and resolution of the mosayc. Most of the time, you want a high resolution for your mosayc, adjust scale accordingly.tilt, default to 10: to give the mosaic a homemade touch, the tiles will be randomly rotated and this parameter controls the intensity of the rotation. Set it to 0 if you want straight tiles.color_shift, default to 100: mosaic tries to find the best tile for each pixel, but the colors may not be a perfect fit. The color shift allows to rectify this, from 0 (the original colors are kept) to 100 (change colors so they fit the target pixel).quotas, default to 3: how many copies of each tile are you allowed to use? This plus the number of tiles controls the tile-resolution of your mosaic. For a nice looking mosaic, a thousand tiles is nice, meaning you need lot of tiles or to adjust your quotas accordingly.root_dir, default to.: working directory
Examples#
For this tutorial, we show the result as small 300x300 images to save loading time. For real use, consider resolutions adapted to your use case!
[1]:
from mosayc import Mosayc
from IPython.display import display


def show(img):
    display(img.resize((300, 300)))
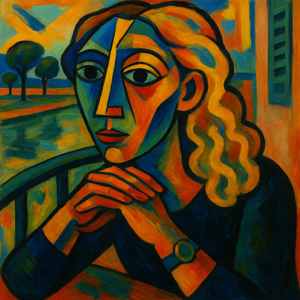
This is the base image we will use:
[2]:
from PIL import Image

show(Image.open("main.jpeg"))
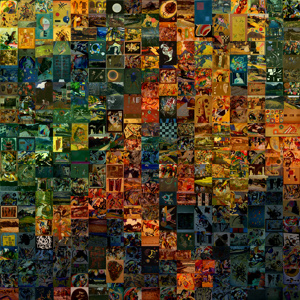
The tiles are Kandinsky pictures from https://commons.wikimedia.org/wiki/Paintings_by_Wassily_Kandinsky
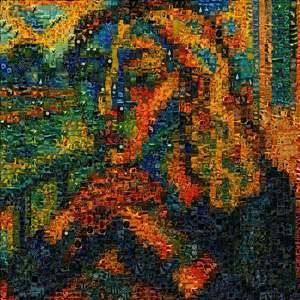
OK, give it a try without any duplicate:
[3]:
show(Mosayc(quotas=1).compute())

The tiles are too big! Let’s increase the quotas.
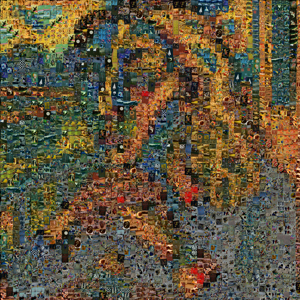
[4]:
show(Mosayc(quotas=8).compute())
Better! Now, let’s see what happen if we change other parameters:
Partial color shift:
[5]:
show(Mosayc(quotas=8, color_shift=50).compute())
Straight tiles (without redundancy so the effect is more visible):
[6]:
show(Mosayc(quotas=1, tilt=0).compute())
CLI interface#
The CLI processes the parameters, compute the mosaic, and saves the result. The main difference w.r.t. Python interface is that you the output is automatically saved (you can specify its name). mosaic --help will give you the following details:
Usage: mosayc [OPTIONS]

  Console script for mosayc.

Options:
  -I, --input PATH         Location of the main photo  [default: main.jpeg]
  -O, --output PATH        Mosaic name  [default: mosaic.jpeg]
  -D, --tiles_dir PATH     Location of the tiles directory  [default: tiles]
  -S, --scale FLOAT        Scaling factor of main photo  [default: 3.0]
  -T, --tilt FLOAT         Max tilt of tiles  [default: 10.0]
  -C, --color_shift FLOAT  Color adjustment intensity  [default: 100.0]
  -Q, --quotas INTEGER     Max number of copies of a tile  [default: 3]
  -R, --root_dir PATH      Working directory  [default: .]
  --help                   Show this message and exit.